Showing posts with label Accessories. Show all posts

Friday, August 9, 2013

Fabric Pouch Makeover: Two Ways

Does anyone else love the Dollar Spot at Target?  Who am I kidding, everyone loves the Dollar Spot.  Well, you should go right now because they have some cute little fabric pouches.  You could use them as is, but really why not personalize?


The first one I made by simply drawing a design on with a fabric sharpie.  I started by sketching out  a design in pencil.  I chose a Dalek because I'm a Doctor Who fanatic but you can do whatever.


Then I just went over it with my sharpie.  After some quick advice on Facebook, I added the word "Consolidate." (It's better if you say it in a Dalek voice.)


For the next bag, I went a little girlier.  I started by cutting out a square of fabric and a square of iron on interfacing. Then trace a frame on the paper of the interfacing; I used a circle and then added little bumps all around the edge.  Cut out the fabric and iron onto the bag.  


To add a silhouette, draw a design on freezer paper.  I drew a circle and then found a silhouette image online.  If you hold the paper up to the screen, you can trace it.  Then cut out the circle and silhouette.


Iron these pieces onto the fabric.  Then fill in with black fabric paint.  I didn't have any paint so I used a fabric stamp pad.  Just use a makeup sponge to fill in the area.


The freezer paper then just peels off.  I used my fabric sharpie to add some details to the frame.


So there you go!  Two ways to do a pouch.  Or just combine them and do a Dalek silhouette...


Sunday, April 28, 2013

Fabric Belt Tutorial

Here's a quick and easy project to jazz up any outfit.  To make this fabric belt, you need a fat quarter of fabric and a set of D rings (you can find them at a fabric store like Joann).


Start by cutting two strips of fabric.  The total length of the strips should be how long you need your belt to be so you should measure your waist and add a few inches.  The height will be twice the size of your D ring plus a little.  Mine were the length of the fat quarter and about 3" wide. 

First, sew your two strips together to make one long strip.  Fold in half and iron and then sew along the length of the strip, forming a tube.


Turn inside out and iron flat.  Tuck the ends in on each side and pin in place.


Sew along the edge of the entire piece.  Now pick one end and loop the belt through both D rings.  Fold over about an inch and sew into place.  I sewed several horizontal stitches.


Now put on your belt and have someone take an awesome modeling shot for you.  It helps if your bangs look a bit crazy in the photo.  Also take an awkward photo of your chest. Nice.


Tuesday, April 2, 2013

Baby Flapper Headband DIY

Babies are cute.  Babies in headbands, super cute.  Babies in feathery headbands, I can barely even talk about it.  Here's a quick project to jazz up the heads of any babies in your life.


Start with some elastic (I chose ruffle elastic), feathers, and felt.  Measure your babies head and cut that much elastic.  My two-month old has about a 16" head if that helps.


Now start on your jazzy accent.  I created mine by hot-gluing feathers to felt.  I started with a heart shape but wasn't happy with it.  I then switched to felt circles.


This wasn't quite enough so I added a button.  I then added a circle of hot glue and covered it with glitter.  I had no idea if this would work but it created a cool dimensional effect.


Finally, I sewed my felt piece onto the two ends of elastic, securing them together. The last step is to find a cute baby to model it.  Probably it will fall off as soon as you set your baby down and she starts wiggling, but cute while it lasts.


Tuesday, July 17, 2012

IC#14- Denim Tote Bag

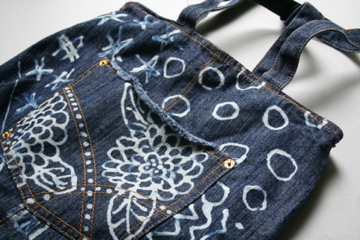
We're in the process of moving, so I kept this Iron Craft project really simple.  We were challenged to make a project with denim.  I took a denim tote bag and added some bleached designs.


I started with a plain denim tote bag.  The only other supply needed was a bleach pen.


I slid a plastic lid into the tote bag to keep the bleach from soaking through.  I then started doodling all over.


I let it sit for about 30 min and then washed in the washing machine.  That was all!  Pretty simple project.


Want to see more Iron Craft pieces?  Check out the flickr group here.  Want to join in the fun?  Check out the blog here.

Tuesday, July 3, 2012

IC#13- Red White and Blue Brooch

Our Iron Craft Challenge this week was "Red, White, and Blue."  I chose to make a felted star brooch.  Here's my step by step.


I started by felting each star.  I started by slowly felting all around a small bunch of roving to create a ball.


I then flattened the ball by felting on each side.  I started forming the star shape by turning the piece on its side and working in five points along the edge.


I slowly worked on this to form the star shape.  Some of the points ended up too small so I added a bit of extra roving.


Once I had three stars, I attached them to a piece of felt to help secure them together.  I added a bit of extra roving on the back to secure it.


Finally, I sewed a pin back onto the back of my piece.  That is it!


Want to see more Iron Craft pieces?  Check out the flickr group here.  Want to join in the fun?  Check out the blog here.

Thursday, June 21, 2012

Dalek Tote Bag- Exterminate!!

I found these plain white tote bags at Target the other day for only $2.  This seemed like the perfect way to play with my Sharpie Stained markers.  What did I decide to create?  A Doctor Who themed bag of course!


I started by drawing out a Dalek on a blank sheet of paper.  I free-handed it, but you could easily print out an image from online. 


Next, I transferred my image to the bag.  I did this by coloring the back of my drawing with pencil and then laying the drawing on the bag.  Next I traced over my image.  This transferred the pencil to the bag.


Finally, I traced the pencil drawing with my sharpies.  I added the word "Exterminate" to the side. 


That's it!  Don't you love the way I didn't iron my bag before I started working on it?  I'm so classy.