Showing posts with label Jewelry. Show all posts

Sunday, February 23, 2014

Yarn Pendant

Hey Crafty Friends-

Here's a fun and simple project if you feel like wearing your love of knitting on your sleeve...err...neck.


You will need a metal pendant piece (I don't know the technical term), yarn, glue, and cardboard.


Start by cutting the cardboard slightly smaller than the size of your pendant.  Cover one side with glue and start wrapping the yarn around.


Alternate the direction you wrap to make a woven pattern.  Cover all edges of the cardboard.


Now fill your pendant with glue and press the yarn piece into it.  Hold or clamp until it dries a little.


Done!  Looking good, you beautiful yarn crafter, you.

Monday, April 22, 2013

Hip Hop Hippo Necklace

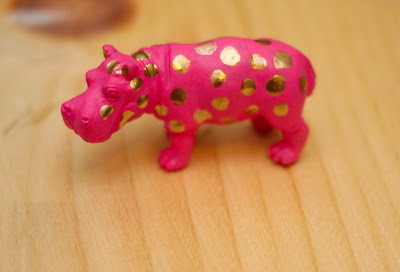
Plastic animal crafts are pretty trendy these days so I decided to jump on the bandwagon.  Here is my creation, a funky hippo necklace.


Start with your plastic animal toy of choice.  I found a tube of small animals at Michaels and used the hippo because they are one of my favorite animals.  Use acrylic paint to paint it your color of choice.  You will probably need several coats.


Now use gold leaf paint to add polka dots (or any design you so choose).


Once dry, finish with a coat of clear acrylic varnish and screw an eye screw into the top.  Finally, you will attach a long piece of chain to the eye screw using a jump ring.  I made the chain long enough to go over my head without a clasp.


Ta-da! That's it!  I rocked my necklace for date night.  Gotta love a night out without the baby :)


Want to try some more animal crafts?  Here is a sampling of tutorials from around the web:

Animal Coat Rack
Animal Jar Lids
Animal Candle Holders
Animal Magnets

Wednesday, November 14, 2012

Wooden Toddler Locket Tutorial

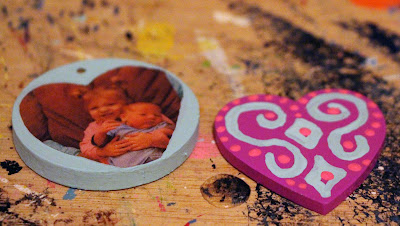
One of my favorite little girls just turned two the other day so I wanted to make her a very special birthday present.  She LOVES playing with my necklaces, particularly my locket.  Whenever she sees me wearing it, she says, "Open! Open!"  I thought it would be nice to make her her own little locket.  This is what I came up with.


I spent quite a bit of time brainstorming on how to make this kid safe.  I even enlisted some help from my husband.  We started by taking a wooden heart and a wooden circle and drilling a hole partway though the middle of each piece.  I then glued a magnet into the center (NOTE: use a strong magnet!)  This will hold the two pieces together but allow for them to be easily "opened" by little hands.  You should also drill a hole on the top to tie the ribbon on.


Next, I printed out a picture of her mom and dad as well as a picture of her and her little brother.  I used Mod Podge to glue the pictures onto the wooden pieces, over the magnets.  Notice how I cut one picture to fit behind the heart.


Once this was dry, I painted the rest of the wooden pieces around the pictures.  Next, I used more paint to decorate the front of the heart.


Finally, I sealed the whole piece with Mod Podge.  Once dry, I tied a long piece of ribbon on that can easily be slipped over her head.


That's it!  She liked it a lot.  I told you to use a strong magnet because mine wasn't quite strong enough and the front heart tended to fall off when she was playing.

Saturday, November 3, 2012

Ears to You Blog Hop

Hey All-

Awhile back, Amy at Copper Diem posted about an organization called Ears To You.  They donate earrings to cancer patients to give them a little pick-me-up while they are going through treatment.  Amy invited us all to make some earrings to donate and then share them today as part of a blog hop.  You can check out my earrings below and be sure to stop by and visit some of the other blogs!


I chose to use this as an opportunity to play around and make different earrings than I normally do.  So I didn't use any wood, fabric, or paint.  Crazy, huh?  The designs are all much simpler but I hope they find a good home.


This last pair is my favorite.  I have these "Made With Love" charms that I sometimes attach to jewelry I make.  I suddenly thought, why not make them into earrings?  That way the person wearing them will know they were made with love :)


Other Blog Hop Participants:

Copper Diem
My Addictions
Beads, Tea and Sweets
Juls Beads
Fabric of my Life
Blogging Business Artisans
Jeannie's Blog
Lorelei's Blog
One Kiss Creations
Backstory Beads
According to Katie
Cherish Designs
Beads: Rolling Downhill
Falling Into The Sky
Garden Path Beads
Antiquity Travelers
Sissy and Jacks
Erin Siegel Jewelry/Art Bead Scene
Northwood Creative Studio
SilverRose Designs
Dreamin of Beads/SAS Jewelry Design
Cabe Woman
Summers Studio
Honey from the Bee
Shaiha's Ramblings
Mama's Got to Doodle
Beads for Busy Gals
Tanya McGuire
Creative Atelier

Saturday, June 23, 2012

IC#12- A Photo Pendant

I completely forgot about Iron Craft this week.  As in, I saw a blog post on Tuesday revealing a completed project and I thought, "oh yeah, it's iron craft day."  So here's my photo project, only a few days late.


The theme was to use a photo.  I chose to make a pendant with the space needle, in honor of my current home.  I found a photo online, re-sized it, then printed it out.   I used normal Mod Podge to adhere it to a wooden oval and then covered it with Mod Podge dimensional magic.  Finally, I glued a bail to the back.


That's it!  Now, hopefully I will actually remember to make my project for the next time!

Want to see more Iron Craft pieces?  Check out the flickr group here.  Want to join in the fun?  Check out the blog here.

Saturday, May 26, 2012

Cocktail Hour Blog Hop

Hello!  Recently, Copper Diem challenged us to create a piece of jewelry based on a drink.  I was assigned Caipirinha.  Having never heard of this drink, I did some research.  Turns out it is made with sugarcane rum, sugar, and lime and is a popular drink in Brazil (source).   Here is my necklace:


Do you like it?  I focused on the lime and added some sparkles for the sugar.  Check out some of my in progress shots:


I was glad I got to make a popular drink from Brazil.  When I was growing up, my best friend's dad was from Brazil.  This meant that I got to eat lots of Brazilian food and cheer on the team during the world cup.


Here is a list of the other blog-hoppers.  Go give them a visit and see some of the other jewelry creations.

Hostess:  Copper Diem

Stefanies Sammelsurium
My Bead Journey
Adventures with Kelly
Mama's Got To Doodle
Sadafulee
Wait Just One More Bead
Cynth's Blog
Palm Coast Art
Green Shoot Jewellery Designs
Cianci Blue
Dreamin Of Beads / SAS Jewelry Designs
Beads for Busy Gals
Oregon Made Jewelry
My Addictions...Handcrafted Jewelry by Patti
Moods by Mari
Soul of Mine Embodiment
Uniquely Yunikua
Fabric of My Life
Firefly Visions
Indigo Heart
The Peaceful Bead
Casa de Everly
Heaven Lane Creations
Sue Beads
Durga Jewelry
Honey Bijou
A Bird in the Hand Art (You are here)
SilverNikNats
Rainy Day Designs
Tell Your Girlfriends


Thursday, May 10, 2012

New Jewelry Pieces

I've been experimenting with my wooden jewelry lately and just finished putting some of these pieces in my etsy shop.  Let me show you some of the pieces I have been working on.

Red Floral Necklace

First off, you might notice that I have started painting the sides and backs of the pieces.  I used to leave these plain wood because I like the contrast of the wood and fabric.  However, now I'm thinking the painted wood adds a finished touch and an extra pop of color.

Red Geometric Necklace

Red Geometric Earrings

Second, I tried making some pieces with glitter.  I covered the finished piece with Mod Podge Dimensional Magic and then added glitter.  It definitely gives it a different look.  I hope to keep experimenting with this.

Pink Glitter Earrings

Green Glitter Necklace

What do you think?  Do you like these new styles?  Did you prefer the old?

Wednesday, April 25, 2012

My New Earrings

I've been drooling over the jewelry of Material and Movement since I first spotted it at Urban Craft Uprising several years ago.  Well, my husband got me some earrings for my birthday! 


Don't you love them?  I think her work is just stunning.  So unique and so beautifully made.

Friday, April 20, 2012

Color-Block Leather Bracelet

I found a leather bracelet on sale at Michael's the other day and decided it was a perfect time to try out the whole color-blocking trend.  Here's what I did.


I started with the plain bracelet.  If you were fancy, you could cut out your own bracelet.  But this one was super cheap so why not?  I started by removing the hardware.


Then I decided which section to paint and blocked off the rest with painter's tape.


Then I added a few coats of pink paint.  I had been wanting to try out the new Martha Stewart paint so I bought some for this project.  It went on great and seems to hold up well.


Once it had dried a bit, I pulled off the tape and then let it dry a little longer.


Finally I reattached the hardware.  DONE!  I'm excited to wear it on my trip to CA next week.  Did I tell you I'm going to CA next week?  We're renting a house with my husband's family.  Disneyland is in the plan.  Get excited.


Tuesday, April 3, 2012

Artist Palette Necklace Tutorial

I have a confession.  I'm dreaming of writing a craft book.  As much as I enjoy making finished products, I'm happiest when sitting at my craft table, dreaming up new projects.  It must be the scientist in me but I just love experimenting.  So I'm thinking of writing a book.  Which means I am putting lots of extra time into craft experiments and tutorials.  You may have noticed an increase of tutorials on the blog.  If you ever have feedback on them, I would love to hear it.  With that in mind, here is another one of my crafty experiments.  Enjoy.


As you may know, I love playing with shrinky dink.  I had so much fun dreaming up the woven shrinky dink bracelet.  This time, I took it to the next level and incorporated another childhood favorite, Perler beads.  To start, draw out the shape of an artist's palette on white shrinky dink.  You can freehand it if you feel confident, otherwise just print and trace.


Cut it out and then cut out the thumb hole.  I used a hole punch and then scissors to enlarge the whole a bit.  I also punched a whole to hang it from but later realized this was irrelevant; it melted away.


Bake your shrinky dink at 325 degrees F to shrink it.  Now take it out of the oven and crank the temperature up to 375 degrees F.  Arrange your Perler beads around the palette; these will be your paint blobs.


Okay.  Now put it all back in the oven and be careful not to knock the Perler beads over.  It took about 20min for my beads to melt into blobs.  During this time, you will notice that your shrinky dink starts to melt around the edges.  That's fine.  Shrinky dink can be cooked at a temperature of 450 degrees F to fuse the pieces together and that typically involves a little melting.  [Note- I baked mine on parchment paper, but you may want to use a glass baking dish.  According to the directions, shrinky dink needs to be fused on a glass dish.  I noticed that my parchment paper baked into a nice tan color at 375 so I probably will try glass next time.]


Once melted, remove from oven and let cool.  See what I mean about the small hole I punched melting away?  That's fine though because you can use your thumb hole to attach a chain with a jump ring.


That's it!  All done.  Now put on your necklace and take some awkward modeling shots of yourself where your head is cut off.  Perfect.