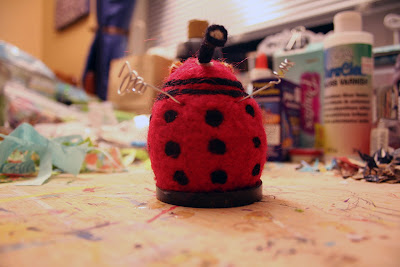
This always happens. Right after I start complaining about my creativity journal and how I don't do anything from it, it sparks a big idea. Yesterday was one of those days. I was challenged to take something that is not cute and cuddly and make it cute and cuddly. Well, what's less cute and cuddly than a Dalek? (although seriously, don't you kind of find it adorable when they say EXTERMINATE!) In case you have no clue what I am talking about, stop reading this right now and go watch Doctor Who.
If you want to make your own little Dalek, start by cutting the bottom off of a Styrofoam egg. This will form the base of your Dalek and cutting it helps it to stand.
Next, start covering it with wool roving. I chose red because I had it on hand and thought it was fun, but you can go classic gray if you choose. Beware, this is a long process. Just spread out a piece and start stabbing. The wool will start sticking to the Styrofoam and form a covering, it just takes a lot of stabbing. Don't cover the bottom because you will glue on a base later.
Now roll out a long piece of black roving. This will form the neck bands. I found it easiest to cover half of the neck at once; hold the roving on either side with your fingers and start stabbing from the middle out. I did this several times until I had two neck bands.
To add the lights on the side of the head, roll out a small ball of orange roving. Working on a felting mat, start stabbing it on one side and then roll it. Stab and roll multiple times until it starts to stiffen up. Then you can hold it on the head to attach it and firm it up the rest of the way.
The side bumps are added in a similar fashion but I didn't worry so much about getting them in stiff balls before adding them on. I just rolled and added to the body. If you would like them a bit more bumpy, just do them like you did the lights.
I formed the eye piece separately and then attached it. I tried several iterations of this before choosing one and forgot to take pictures of the whole process, but I will tell you what I did. I rolled a thick cylinder of black roving and then started stabbing it on the felting mat. I would roll it a little and then stab again. I did this until it got fairly stiff. For the eye on the end, I formed a small black circle and added white to the middle. I attached these by laying them on the mat white side down and holding my black cylinder perpendicular to it. I stabbed around the edge of the log into the circle until they held together. I then attached the other end onto the head with some white roving as the base.
The arms are actually two paper clips that I straightened and then bent with pliers into a twirly and plunger-y shape (those are the technical terms). I also painted a wooden circle black and attached it to the bottom with hot glue. Mr. Dalek was starting to look pretty good, but he needed a bit more.
What's a Dalek without his catchphrase? I stamped the word "exterminate" onto some white fabric and then cut out some pennant shapes. I stitched these together to form a banner. I tied the ends onto the arms and he is ready to go.
I know he's evil and would kill me if he could, but I really just want to give him a hug. Just look how friendly he is with those giant ducks.


He did turn out so cute!
ReplyDeleteToo funny Jenny! Thanks for the great tutorial.
ReplyDeleteOkay, I had to go look it up...LOL :) You sure did make him cute! And I love his little banner!
ReplyDeleteI love how it turned out, the banner really makes it.
ReplyDeleteThat's a clever project! I appreciate that you showed us your process!
ReplyDeleteOh he's so cute! It was fun seeing your process too!
ReplyDeleteJenny, I just saw this, and I love it! My DH and I watch Doctor Who all the time. Great tutorial, too!
ReplyDelete